
Post by sPUNJ on Mar 19, 2005 11:40:01 GMT
Note: this is not mine, it was made by april on Gamp Designs
Tutorial by April
Ok first of all, I used Adobe Photoshop Elements 2.0. So some things might be different if you have the full version... just keep that in mind...
Lets get started:
1) First off, you want to open a 500x500 pixel transparent image.
2) press Ctrl+D to automatically switch to default colors (black foreground and white background).
3) Click the paint bucket tool, then click anywhere on your image to fill with black.
4) Now go to Filter>>Render>>Lens Flare and use the following settings:

do that 5 times, placing a lens flare in all four corners and one in the middle.
**if you want a more crowded and busy effect you can also place some lens flares in between on the sides, but for now lets just stick with the 4 corners and middle**
5) Alright, now go to Filter>>Sketch>>Chrome and use the following settings:
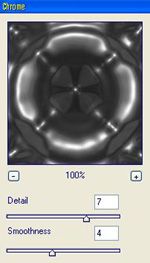
After that you should have something similar to the following:

6) At this point you should colorize the image to any color that you wish. press Ctrl+U to go to the Hue/Saturation screen and check "Colorize" then play around with the colors until you find one you like.
7) Now duplicate the layer and go to Filter>> Distort>>Wave. Click randomize until you find a wave effect that you like and click OK.
8) Repeat step 7 two more times, but make sure that you click the original image in the layers palette before you duplicate the layer.
9) After that's done, click each individual layer (starting with the very first one) and set it to Lighten.
10) Press Ctrl+E to merge each layers together into one.
This should be the final effect:
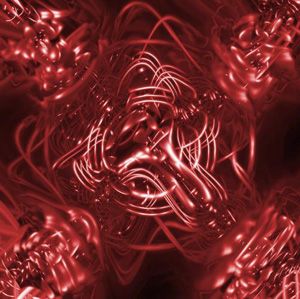
Of course, there can be many varied outcomes and no two are going to look alike, you can play around with the blending features and more wave filters to come up with different outcomes.
Just crop out the portion of the image that you wanna use as your background for your banner.
Tutorial by April
Ok first of all, I used Adobe Photoshop Elements 2.0. So some things might be different if you have the full version... just keep that in mind...
Lets get started:
1) First off, you want to open a 500x500 pixel transparent image.
2) press Ctrl+D to automatically switch to default colors (black foreground and white background).
3) Click the paint bucket tool, then click anywhere on your image to fill with black.
4) Now go to Filter>>Render>>Lens Flare and use the following settings:
do that 5 times, placing a lens flare in all four corners and one in the middle.
**if you want a more crowded and busy effect you can also place some lens flares in between on the sides, but for now lets just stick with the 4 corners and middle**
5) Alright, now go to Filter>>Sketch>>Chrome and use the following settings:
After that you should have something similar to the following:
6) At this point you should colorize the image to any color that you wish. press Ctrl+U to go to the Hue/Saturation screen and check "Colorize" then play around with the colors until you find one you like.
7) Now duplicate the layer and go to Filter>> Distort>>Wave. Click randomize until you find a wave effect that you like and click OK.
8) Repeat step 7 two more times, but make sure that you click the original image in the layers palette before you duplicate the layer.
9) After that's done, click each individual layer (starting with the very first one) and set it to Lighten.
10) Press Ctrl+E to merge each layers together into one.
This should be the final effect:
Of course, there can be many varied outcomes and no two are going to look alike, you can play around with the blending features and more wave filters to come up with different outcomes.
Just crop out the portion of the image that you wanna use as your background for your banner.