Post by SniperJrd on Mar 7, 2005 3:25:05 GMT
I will now show you all how to make abstract Avatars.
Its very easy, so just follow along.
Pre: Open up image, 400x400 [yes, 400x400], transparent
1. Press 'd', and Fill the entire thing with black.
STEP 1 PICTURE
2. Go to Filter, Render, Lens Flare, then put it at these settings:
Lens Type: 50-300 mm Zoom
Brightness: 100
Put it at the center of the image.
STEP 2 PICTURE
3. Use the Smudge tool, at brush size around 19-25, and make a spread out shape, I'm using a star, and use the smudge tool on all the lines 3 times.
STEP 3 PICTURE
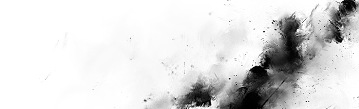
4. Now, go to Filter, Distort, Wave, and press randomize until you get some either that you like, or spread out. [spread out gives a more finished effect for 2nd part.
STEP 4 PICTURE
You can stop here, and just go to the final step if you want to, this right now makes a weird, but effective logo, if you can fit it into a site.
5. Duplicate the layer. Now, go to Filter, Distort, Wave, and press Randomize again, until you get something you like, and is different from the 1st layer.
STEP 5 PICTURE
6. Set this layer to either Screen, or Lighten. (It depends on what you got when you randomized, and what looks good to you). Then, Merge All the Layers.
STEP 6 PICTURE
If you stopped at step 5, come back down here, and follow the steps until the end.
7. Now, all you have to do is resize it to be 100x100.
STEP 7 PICTURE
8. Just press ctrl+I to invert the colors to make it a cool shade of blue, then maybe add a border, and you are finished with your very own Abstract Avatar.
FINAL IMAGE!!!
Hope you liked my first tutorial on this forum!! If you want to post this tutorial at a different site, please pm me and say you are doing so, giving the link to the site. The please, at the site, give some credit to me for creating this tutorial.
Thanks
Its very easy, so just follow along.
Pre: Open up image, 400x400 [yes, 400x400], transparent
1. Press 'd', and Fill the entire thing with black.
STEP 1 PICTURE
2. Go to Filter, Render, Lens Flare, then put it at these settings:
Lens Type: 50-300 mm Zoom
Brightness: 100
Put it at the center of the image.
STEP 2 PICTURE
3. Use the Smudge tool, at brush size around 19-25, and make a spread out shape, I'm using a star, and use the smudge tool on all the lines 3 times.
STEP 3 PICTURE
4. Now, go to Filter, Distort, Wave, and press randomize until you get some either that you like, or spread out. [spread out gives a more finished effect for 2nd part.
STEP 4 PICTURE
You can stop here, and just go to the final step if you want to, this right now makes a weird, but effective logo, if you can fit it into a site.
5. Duplicate the layer. Now, go to Filter, Distort, Wave, and press Randomize again, until you get something you like, and is different from the 1st layer.
STEP 5 PICTURE
6. Set this layer to either Screen, or Lighten. (It depends on what you got when you randomized, and what looks good to you). Then, Merge All the Layers.
STEP 6 PICTURE
If you stopped at step 5, come back down here, and follow the steps until the end.
7. Now, all you have to do is resize it to be 100x100.
STEP 7 PICTURE
8. Just press ctrl+I to invert the colors to make it a cool shade of blue, then maybe add a border, and you are finished with your very own Abstract Avatar.
FINAL IMAGE!!!
Hope you liked my first tutorial on this forum!! If you want to post this tutorial at a different site, please pm me and say you are doing so, giving the link to the site. The please, at the site, give some credit to me for creating this tutorial.
Thanks