

Post by Eleven on Sept 5, 2004 17:00:36 GMT
Ok this was for the Beam Graphic Tourney, but seeing as its a tut, may as well submit it 

What do I need?
Step 1
First take the rectangle/box tool and create a 44x42 box, using the color black.

Like above
Step 2
Using your Zoom tool, Zoom in and cut the top corners of the box off (You should only cut off 3 pixels on each side, Using the 1 pixel white brush tool) That may sound confusing so I will show you an upclose picture:
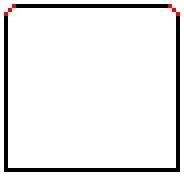
The red indicates what changes are being made. You should NOT have it in red, rather in black.

Thats how it should like as of now
Step 3
Now you will be adding the screen. This will go on the inside of the box you have created. Zoom In and create a box in black. I have put it in red so you can see what I'm adding. Take off the corner of each box (on the screen part)

Step 4
Now you will be adding the 3D parts. Zoom in and add these pixels to the corner of your picture. As I can't explain it clearly, you'll need to go by the picture example. Again, Red indicates what I am adding, and you should add it in black.

Step 5
Now we add a bit more to the 3Dishness ;D

Add the lines as displayed above, by now you should know red lines are what I added, and you should make them black We are starting to see the monitor now!
Step 6
Probably the hardest part, the keyboard. You may find the following difficult and may have to try several times to get it correct. Zoom in and add diagonal lines, connecting them as shown in the image below. You can either do this your self, or feel free to take my image, using Ctrl V to paste my example into your paint and copy the keyboard from there. A Tutorial is to teach you to do it yourself so I suggest you try yourself.

Now we need to add the keys. Again, this is difficult.You need to make small keys except for the space bar which is on long bar. Your design really is up to you, or you can use this mini template I am suppling for you.
Mini Template for keys:

How it should look when keys are added:

Step 6
Time to add color. You should have several different colors, but they need to be closely related. Now of course this won't look exactly like your computer, this is my pixel interpertation. I suggest using dark colors, but that's just my choice. Several parts of the computer should be lighter/darker then the others. The outside should be light, the little 'depth' corner spot should be light as well, along with the keyboard. Everything else a darker color. As this description may be confusing you can look at the picture to understand me better
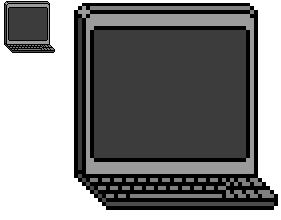
Well your finished! If you'd like to go into more detail you could add a mini website, but I'm not going into that right now
Eleven/E11

What do I need?
- MS Paint/Pixel Drawing Program
- A little Knowledge of Paint Tools
Step 1
First take the rectangle/box tool and create a 44x42 box, using the color black.
Like above
Step 2
Using your Zoom tool, Zoom in and cut the top corners of the box off (You should only cut off 3 pixels on each side, Using the 1 pixel white brush tool) That may sound confusing so I will show you an upclose picture:
The red indicates what changes are being made. You should NOT have it in red, rather in black.
Thats how it should like as of now
Step 3
Now you will be adding the screen. This will go on the inside of the box you have created. Zoom In and create a box in black. I have put it in red so you can see what I'm adding. Take off the corner of each box (on the screen part)
Step 4
Now you will be adding the 3D parts. Zoom in and add these pixels to the corner of your picture. As I can't explain it clearly, you'll need to go by the picture example. Again, Red indicates what I am adding, and you should add it in black.
Step 5
Now we add a bit more to the 3Dishness ;D
Add the lines as displayed above, by now you should know red lines are what I added, and you should make them black
 We are starting to see the monitor now!
Step 6
Probably the hardest part, the keyboard. You may find the following difficult and may have to try several times to get it correct. Zoom in and add diagonal lines, connecting them as shown in the image below. You can either do this your self, or feel free to take my image, using Ctrl V to paste my example into your paint and copy the keyboard from there. A Tutorial is to teach you to do it yourself so I suggest you try yourself.
Now we need to add the keys. Again, this is difficult.You need to make small keys except for the space bar which is on long bar. Your design really is up to you, or you can use this mini template I am suppling for you.
Mini Template for keys:
How it should look when keys are added:
Step 6
Time to add color. You should have several different colors, but they need to be closely related. Now of course this won't look exactly like your computer, this is my pixel interpertation. I suggest using dark colors, but that's just my choice. Several parts of the computer should be lighter/darker then the others. The outside should be light, the little 'depth' corner spot should be light as well, along with the keyboard. Everything else a darker color. As this description may be confusing you can look at the picture to understand me better

Well your finished! If you'd like to go into more detail you could add a mini website, but I'm not going into that right now
Eleven/E11


 It is easy after practice


